Linux is a great OS for MIDI. The problem is that you've got to understand a lot about Linux to get started. This guide is intended to help ease the transition. This document has been tested with Ubuntu 22.04.
This is a very command-line-intensive tutorial. The reason for this is that it reduces the amount of software that is running which has two advantages: performance and reliability. The GUI can introduce new bugs, so it's more reliable to work with the command line tools. We will get to the GUI stuff near the end.
If you would prefer a faster, more GUI approach, start with the "Preliminaries" sections, then jump to the qjackctl and Qsynth sections, then go back to the Virtual MIDI Keyboard section and read to the end. This should get you going quickly. It's still a good idea to read the whole thing as there are many helpful troubleshooting tips sprinkled throughout.
Before we get started, we need to take care of two things:
The next three sections cover these topics.
Audio applications are time-critical, so they need a preemptible (low latency) kernel with a 1000Hz timer frequency.
To check whether you are running a low latency kernel, use uname:
The important thing to notice is not "lowlatency", but "PREEMPT_DYNAMIC". That means that I've got a preemptible kernel loaded. This means low latency.
Note: There are variations on PREEMPT that require a little more investigation. "PREEMPT" means you have a kernel with full preemption and you are good. "PREEMPT_DYNAMIC" allows preemption to be turned on and off at boot time with the kernel's "preempt=" command line option. You'll need to check your GRUB configuration (grep CMDLINE /etc/default/grub) to make sure this is either set to "preempt=full" or not set at all (the default is "full"). You can check the setting (immediately) after boot with "sudo dmesg | grep preempt". There is also PREEMPT_VOLUNTARY which should be "y". I've had no trouble with "not set" as well.
Next we want to make sure the timer is configured for 1000HZ. To do this, we use grep on the kernel config:
"CONFIG_HZ_1000=y" tells us that 1000Hz is enabled, and "CONFIG_HZ=1000" tells us the clock frequency is 1000Hz. So, we are ready.
If you don't see PREEMPT or 1000Hz as above, you'll need to install a low latency kernel.
In Ubuntu you can list the available lowlatency kernels with apt-cache search:
Pick the newest, (without "edge"), install it:
...and reboot. Then go through the steps above again to make sure you actually have a low-latency kernel.
Other distros should provide something similar. See the Low Latency Kernel section for more options.
Audio software needs to run at a higher priority and with memory locked so that it doesn't swap out to the hard disk. To give a user that power, we create an "audio" group, give that group some special privileges, then add the user to that group.
Note: Ubuntu/Debian can set up a properly configured audio group for you when you install jackd2. If you'd like, you can do this before continuing:
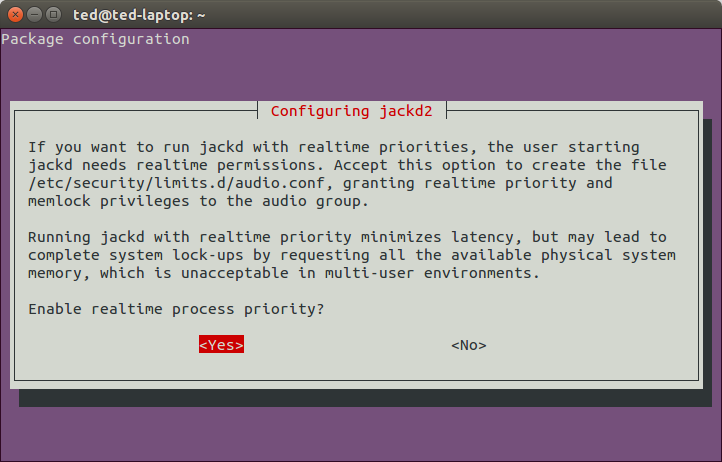
Be sure to say "yes" when it asks if you want to enable realtime process priority:
After jackd2 is installed, you can skip to "Add Users To "audio" Group" below.
If jackd2 is already installed and you want to check the configuration, you can reconfigure it with: "sudo dpkg-reconfigure jackd2". That will display the above prompt and let you switch between "yes" and "no".
First, let's check to see if your system already has an audio group:
If you see an "audio" line like the one above, then you've already got an audio group and you can skip to Group Limits.
If grep didn't find an audio group, add one with groupadd:
The limits for the audio group can usually be found in /etc/security/limits.d/audio.conf. Check to see if that file exists on your system. If not, create one. You might need to create the limits.d directory. Use mkdir for that:
Then create the audio.conf file in there. I usually use nano:
And add the following lines:
The rtprio line gives the audio group the ability to elevate real-time priority to 95 (99 is the highest). JACK needs to be able to do this to handle audio in real-time. The memlock line gives the ability to lock any amount of memory. fluidsynth needs to be able to do this to keep the soundfont in memory while it is using it. fluidsynth will issue error messages about not being able to "pin" memory if this isn't working.
The commented out "nice" line would give the ability to raise nice priority to -19 (-20 is the highest). Since it is commented out (#), it does nothing. I've just provided it for reference.
For more info, see the man page for limits.conf(5).
Even if all of the above was already done for you by your distro, the chances are good that you'll still need to add yourself to the "audio" group. You can check to see if you are already in the "audio" group with the groups command:
In this case, we can see that I am not in the audio group yet, so I need to add myself with gpasswd:
You'll want to use your userid instead of "ted" when you do this.
This change will not take effect immediately. Depending on how your system is setup, you may either need to logout and log back in again for this change to take effect or you might need to reboot (Ubuntu 22.04 requires a reboot). Use the "groups" command to see if you were successfully added to the audio group.
The preliminaries are over. Your system should now be ready to do everything described in this document. You can feel free to jump around if you'd like. E.g. skip to the qjackctl section if you'd like to see the GUI approach. If you are having trouble, come back here and go through this tutorial sequentially to find where the problem is.
If you want a thorough understanding of Linux's support for MIDI, read on...
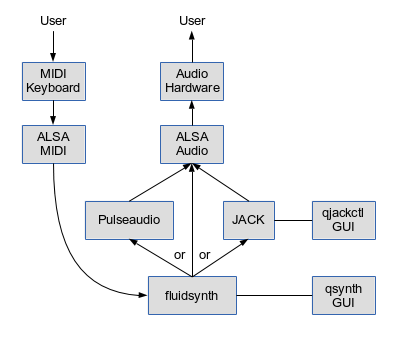
ALSA, the Advanced Linux Sound Architecture, is the part of the Linux kernel that talks to your sound-related hardware, like sound cards and MIDI interfaces. It is made up of device drivers and other kernel modules that provide useful audio-related functions. Many distros already have all the ALSA-related parts of the kernel built-in, so all you have to do is plug in your hardware and use it.
To uniquely identify each piece of audio hardware on a system, ALSA assigns them unique names. Usually, "hw:0" is the name of your soundcard. The various audio programs assume that they will be working with hw:0, but they all provide ways to change this.
You can run into trouble if your soundcard isn't where you think it should be. So, we need to figure out what audio device names have been assigned to which devices. There are two ways to do this. First we can check /proc/asound/cards:
The numbers to the left indicate the card number. So in this case, number 2 is my soundcard. This means hw:2 is the ALSA device name I need to use. But this doesn't tell the whole story. There may be multiple devices per card. aplay gets us that information:
From this, we can see that I have two sound devices on my system. The first is card 2, device 0, or "hw:2,0". That is a standard sound device that is connected to my speakers and headphone jack. The second is card 2, device 3, or "hw:2,3". That is the sound device that drives my HDMI port.
Note that there is also a subdevice level. It appears that the general form is hw:card,device,subdevice. If you leave subdevice or device off, it assumes 0.
System-wide ALSA device names and aliases (e.g. "default" and "pulse") can be found in the alsa.conf file (usually found in /usr/share/alsa) and in the files in the alsa.conf.d directory. See asoundrc on the ALSA wiki. It describes how to create your own device names and aliases which can be very helpful with multiple soundcards.
Hopefully "hw:0" is all you need to know after looking at your device lists. If not, then be sure to jot down the appropriate device name that you discovered, and use it where you see "hw:0" for the rest of this tutorial.
Use aplay to test ALSA audio. aplay is a simple audio player that can play WAV files. We'll use sox to generate a test WAV file. First, make sure sox is installed:
Then use sox to generate a WAV file and play it with aplay:
"Device or resource busy" - If you get a "Device or resource busy" message, that means someone else (like pulseaudio) is using the soundcard. In that case "-D pulse" might work. See Killing pulseaudio.
"Channels count non available" - The one tricky thing about aplay is that the WAV file format must match the exact format that the device expects. If you get a "Channels count non available" message from aplay, then the format doesn't match.
pulseaudio sits on top of ALSA and, in theory, adds some sort of value. I'm guessing that a long time ago, ALSA didn't offer support for multiple applications accessing a soundcard at the same time (multiplexing). pulseaudio does this. However, ALSA has since added multiplexing, and pulseaudio seems rather useless to me. So, for our purposes, pulseaudio is simply something that gets in our way.
The various troubleshooting sections will point out when pulseaudio may be getting in the way. They will then suggest checking out the Killing pulseaudio section for various ways to get rid of it.
Note: There's a new player in town called "pipewire". I've not had occasion to try it. It's intent is to provide the features of both pulse and JACK and work better than both. Ubuntu 24.04 LTS will most likely use it by default. I will definitely give it a try then. Let me know if you would like to see some coverage before then and I'll have a look.
fluidsynth is a software synthesizer or "softsynth". It can convert MIDI data into sound by using a "soundfont". On an apt-based distro (Debian, Ubuntu, Mint...), you can do the following to get fluidsynth and a soundfont (fluid-soundfont-gm) installed:
Other distros should have similar packages available. To play a MIDI file called "song.mid":
For testing, there are many sites with free midi files to download. http://www.piano-midi.de/ has some. Or search on "midi files".
To stop fluidsynth, type "quit" at its ">" prompt. We'll need to stop fluidsynth for the next section.
"audio device is used by another application" - Someone else (like pulseaudio) is using the soundcard. See Killing pulseaudio.
Instead of having fluidsynth play a MIDI file, we can also have fluidsynth make music from MIDI data that comes from other programs. To test this, we'll use the program aplaymidi which is part of the "alsa-utils" package. In apt-based distros:
Now we'll run fluidsynth as a server. This means that it will run and wait for other programs to connect to it and send it MIDI data.
You'll want to leave that running and bring up another terminal window. There you can use aplaymidi to find out what port number fluidsynth is waiting on:
Here's what mine shows:
Note that fluidsynth is on port 128:0. We'll need to use that to let aplaymidi know where to send MIDI data:
To stop fluidsynth, type "quit" at its ">" prompt. We'll need to stop fluidsynth for the next section.
Note: In Ubuntu 22.04, fluidsynth has not been closing successfully for me. I have had to use "pkill -9 fluidsynth" to get it to go down. If fluidsynth is stuck, you will get the "device in use" errors that are usually caused by pulseaudio. Make sure fluidsynth goes down when you ask it to. Use "pgrep -a fluidsynth" to check.
Up to this point, we've seen how to do audio work with the ALSA drivers directly. However, for serious work, JACK is a better choice since it offers low-latency and the ability to synchronize multiple audio sources. You can think of JACK as an improved pulseaudio. JACK is (as the marketing types might say) "designed to meet the demands of audio professionals."
Before we get started with JACK, be sure to close any audio applications you've been using.
There are two versions of JACK: JACK1 and JACK2. These are interchangeable. I've had better luck in the past with JACK2, so I tend to use it. If you didn't already install JACK2 back in the "Audio Group" section, install it now.
To run the JACK Daemon (jackd):
The defaults for JACK are --rate 48000 and --period 1024. FluidSynth uses a sample rate of 44100, so going with 44100 reduces the amount of work that needs to be done. Setting the period to 128 frames (5.8 msec with 2 buffers) reduces latency to something much more suitable for music-making. The default value of 1024 is 46.4 milliseconds (with 2 buffers), which is a very noticeable delay.
ALSA Device Names - If you give JACK the wrong ALSA device name, you will get an "ALSA: Cannot open PCM device alsa_pcm for playback. Falling back to capture-only mode" error from JACK. See ALSA Device Names above.
The playback device "hw:0" is already in use. - If you get an error message like:
...then pulseaudio isn't getting out of JACK's way. See Killing pulseaudio.
It's also possible that fluidsynth is still up. In that case you'll get a similar message that doesn't mention pulseaudio. Make sure you've quit fluidsynth. If that doesn't get rid of it, you might need to "pkill -9 fluidsynth".
"Failed to acquire device name" - If you get an error message like:
...then JACK and pulseaudio are having a bit of a disagreement over who should get the soundcard. See Killing pulseaudio.
We can use jack-play to make sure JACK audio is working. It's part of the jack-tools package in Debian-based distros:
We'll use sox to create a WAV file for testing.
Next, we need to tell jack-play what JACK port to connect to. This is done via the JACK_PLAY_CONNECT_TO environment variable.
The "%d" is expanded to the channel number while connecting. So, with a stereo WAV file and the above value, jack-play will connect to system:playback_1 and system:playback_2.
Finally, we can test JACK with jack-play:
Note: In older versions, jack-play was called jack.play, so if the above doesn't work, try a dot instead of a hyphen.
To run fluidsynth with JACK, bring up another terminal, and:
And finally, to test, bring up another terminal and use aplaymidi to send a MIDI file to fluidsynth's port. Be sure to check which port fluidsynth is on, as it can change. See aplaymidi above.
To bring everything down, first stop fluidsynth by entering the "quit" command at fluidsynth's ">" prompt. If it hangs here (Ubuntu 22.04 seems to have problems), press Ctrl+Z and then do a "pkill -9 fluidsynth".
Then switch to the terminal that is running JACK and hit Ctrl-C. Worst-case, you can use killall to stop JACK:
Important Note! JACK takes over the soundcard on your computer. This means that your usual audio and video players will be broken while JACK is running. This includes rhythmbox, amarok, vlc, Adobe flash, etc.... I oftentimes find myself wondering why youtube videos aren't working. Then I remember that I left JACK running. So, if your normal audio and video players aren't working, try "killall jackd".
Since most Linux music-making applications depend on JACK, and JACK's defaults are not suitable for music-making, we need to set up a .jackdrc file. The .jackdrc file lives in your home directory and it contains the command line that programs should use to start JACK if it isn't already running. Here's what mine contains:
The only difference between this and what we did at the command line is the full pathname to jackd, /usr/bin/jackd. Make sure you set up a .jackdrc file before continuing.
Note: qjackctl (the JACK GUI) will clobber your .jackdrc file without warning. If you find .jackdrc useful, you should keep a backup of it and avoid qjackctl.
We can pull all of the above together into a script for starting JACK and FluidSynth:
I call it "audio" and keep it in ~/bin. To use the audio script, just tell it whether you want to start or stop the audio servers:
If bash can't find the script in ~/bin, you can add the following to the end of your .bashrc to make sure you can run scripts from ~/bin:
This audio script isn't perfect (piping the output to a fixed name in /tmp is never a good idea), but it's a start. Feel free to make improvements and send them to me. It is licensed under the GPLv3+.
At this point, we are ready to start looking at music-making software. If you would prefer to see how starting JACK and fluidSynth can be done with a GUI, jump down to the qjackctl and qsynth sections.
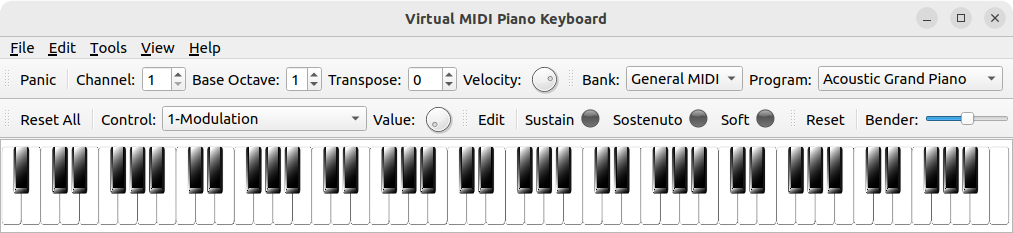
In case you don't have a physical MIDI keyboard, you can use a virtual one. For this tutorial, we'll use vmpk, the Virtual MIDI Piano Keyboard. To install:
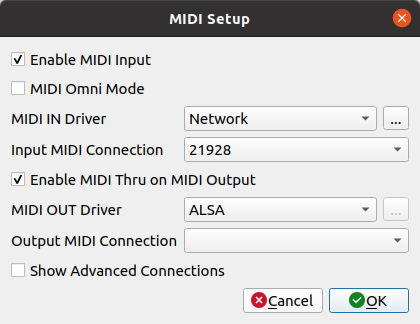
The first time we run VMPK, we'll need to do some configuration. This applies mainly to newer versions of VMPK, so if you don't find these settings, you are probably OK. First, make absolutely certain JACK and fluidsynth are not running. Then launch VMPK:
Go to Edit > MIDI Connections and set the "MIDI OUT Driver" field to ALSA.
Now you can safely launch VMPK and JACK/fluidsynth together. (VMPK 0.7.2 would lock up if you tried to switch it to ALSA while JACK and fluidsynth were running.)
Launch JACK and fluidsynth. If you're using the "audio" script:
If you press the keys on VMPK, you may or may not hear sound at this point. Newer versions of VMPK find fluidsynth and connect to it automagically. To get us all to the same point, use aconnect to clear all ALSA MIDI connections:
Now you shouldn't hear anything when pressing keys on vmpk. To fix this, we'll use the "aconnect" command to (re)connect VMPK to fluidsynth.
First, we need to check which MIDI ports fluidsynth and vmpk are on. Note that the options for aconnect are backwards from what you might expect. The "-i" option displays the output ports, while the "-o" option displays the input ports. This is from the point of view of aconnect rather than the point of view of the devices themselves. So, let's try "aconnect -i" to see the MIDI "output" ports (those that aconnect can "input" from):
From this we can see that "VMPK Output" is on port 129:0. Note that the "0" on the 'VMPK Output' line is the 0 after the colon. Next we use "aconnect -o" to make sure fluidsynth is where it usually is:
Sure enough, fluidsynth is at 128:0. Now to connect the two together:
And you should hear piano when you play the keys on vmpk. If not, try changing the instrument in the "Program:" field. Sometimes fluidsynth needs a reminder of what instrument to play.
In true Un*x/Linux fashion, we can automate the connection with a script. I call it "vmpk-connect" and keep it in ~/bin:
If you prefer something a little more graphical when connecting MIDI devices, try aconnectgui:
aconnectgui shows your MIDI devices as boxes. You can make connections by selecting the patch cable toolbar button and then clicking and dragging from one arrowhead to another. To break connections, select the scissors button and click on the vertical portion of a connection's "cable".
aconnectgui doesn't always refresh when MIDI apps and devices come and go. You may need to close and reopen it on occasion.
As an alternative, if you use qjackctl, you'll find that it has a "Connect" button that leads to a connection GUI with an ALSA tab.
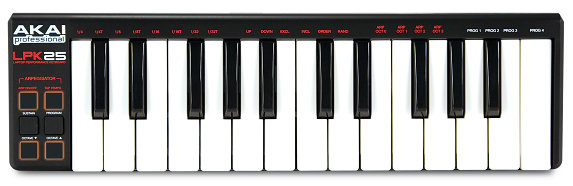
There are several MIDI controllers on the market that connect via USB. I have the (adorable) Akai LPK25. When I plug it in and take a look at my MIDI devices, I see the following:
So 20:0 is the LPK25. I can connect it to fluidsynth (which happens to be at 129:0 for me right now) using aconnectgui or aconnect:
The dmesg and lsusb commands can be helpful when diagnosing hardware problems. When I plug in the LPK25, I see this at the end of dmesg:
Then lsusb shows me that it is connected:
If you want to connect external MIDI devices like keyboards with MIDI ports, you'll need a hardware MIDI interface like the M-Audio Uno MIDI Interface. When I plug mine in, I get the following new port:
Once you've got the port showing up, you can connect a keyboard or other MIDI device to the interface and talk to it through that port.
qjackctl provides a GUI for JACK. To install and run:
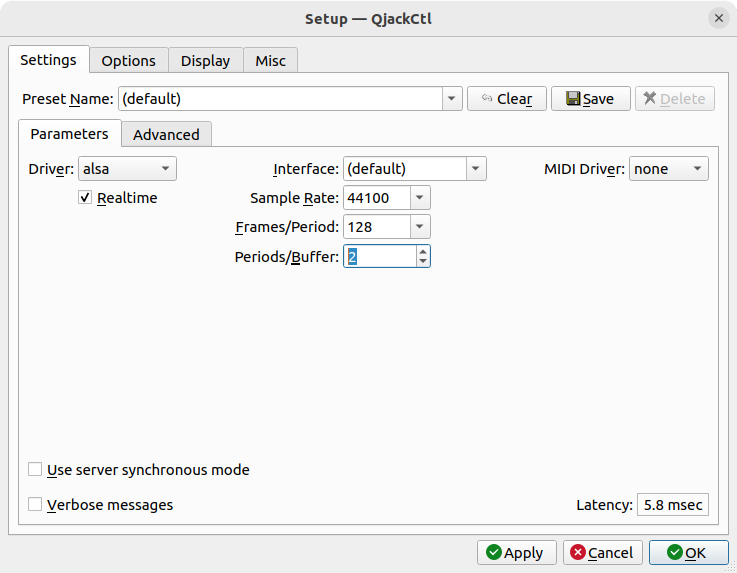
You'll need to configure JACK through qjackctl before using it. Press the "Setup..." button to get the Setup dialog. Many of the settings will be set to "(default)" and that should be ok. Just make sure "Frames/Period" is set to 128, and "Sample Rate" is set to 44100. Also, if you need to use an ALSA device name other than hw:0, check the "Interface" field. See ALSA Device Names above.
Click Ok to close the Setup dialog and press the "Start" button to start JACK.
One annoying thing about qjackctl is that it will overwrite your .jackdrc file without your permission. Bear this in mind in case things aren't working as expected.
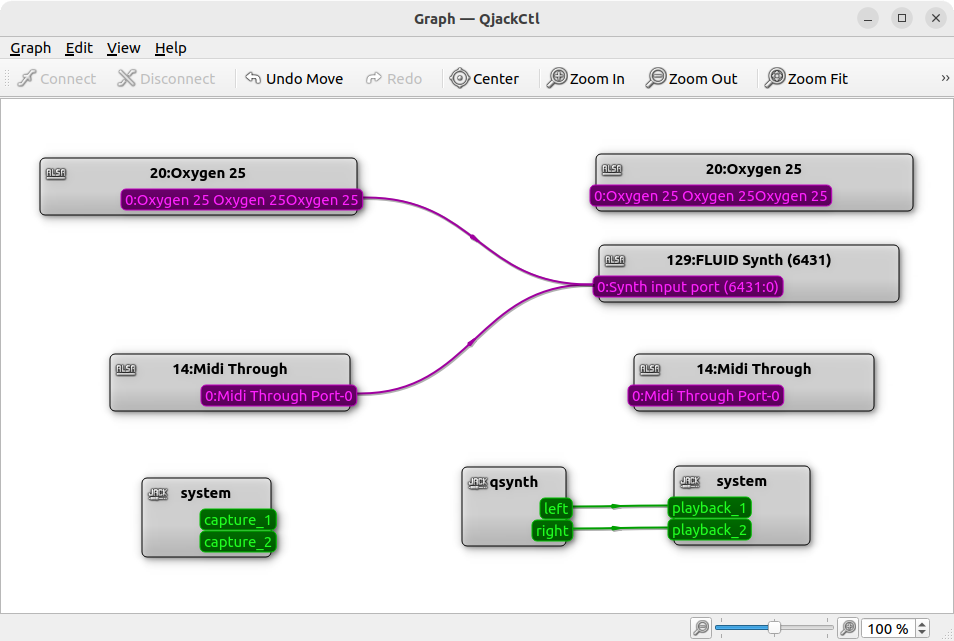
The "Graph" button takes you to a MIDI connection GUI like aconnectgui:
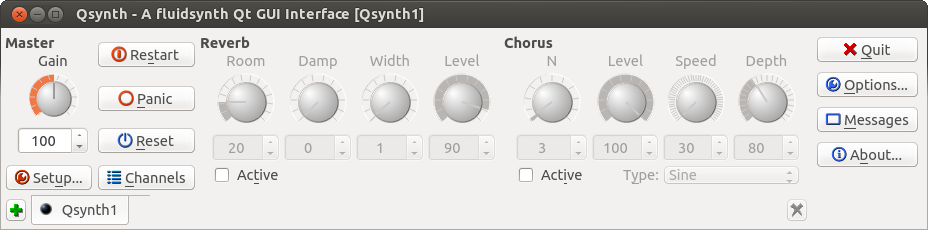
Qsynth provides a GUI for FluidSynth. To install and run:
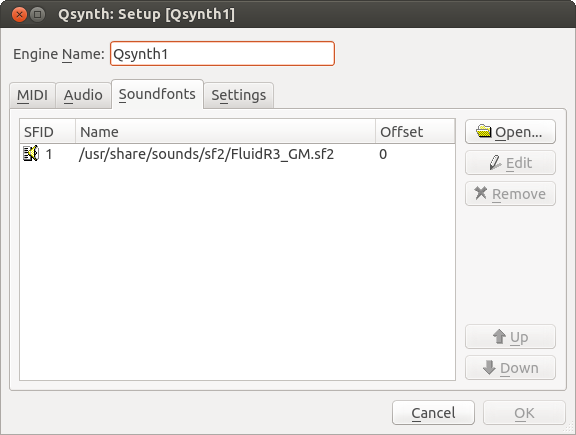
Next you'll need to load the soundfont. Press the "Setup..." button and switch to the "Soundfonts" tab. Click on the Open... button and open the soundfont that we've been using with the command line.
Now test with aplaymidi as usual:
See aplaymidi above.
Note to self: Crashing? Be sure to "export -n QT_FATAL_WARNINGS" before running qsynth. It issues a number of warnings related to missing translations.
Qsynth will launch JACK using the .jackdrc file if JACK isn't running. Make sure your .jackdrc file is set up properly. See .jackdrc above.
Press the Messages button to see the startup messages for JACK and Qsynth.
If Qsynth isn't working, try using ALSA instead of JACK. Launch Qsynth, change the Setup... > Audio tab to use ALSA for the audio driver. Close Qsynth. Stop JACK. Then restart Qsynth. Now pipe something in with aplaymidi. Switch the configuration back to JACK when you're done testing.
If it appears that JACK isn't working properly, you might need to make sure JACK is talking to the correct audio device. Sometimes it gets confused and tries to send audio to a MIDI interface. See ALSA Device Names above.
There are several more synths you can use. Here are some of the command lines for them for reference...
Yoshimi is a very comprehensive algorithmic synth with additive, subtractive, and pad synthesis. It is a fork of zynaddsubfx.
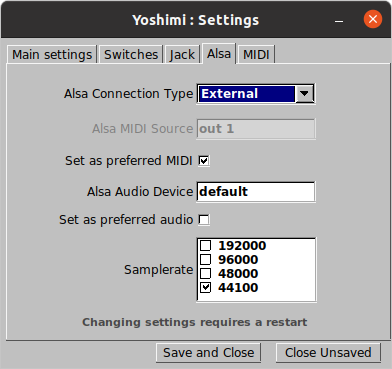
Yoshimi requires a little bit of configuring within its GUI to get MIDI working the way we expect. First, you'll want to go to Yoshimi > Settings > Alsa tab and set Alsa Connection Type to External, and make sure "Set as preferred MIDI" is checked.
Then switch to the Jack tab and make sure Jack Server is "default", "Set as preferred audio" is checked along with "Autoconnect audio".
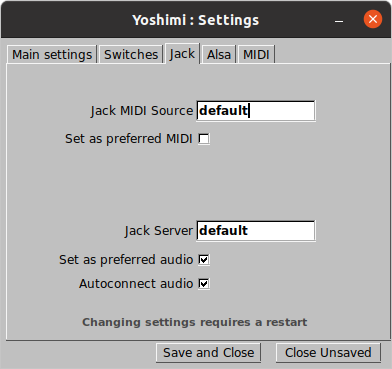
Restart and Yoshimi should provide a "yoshimi" ALSA port and connect to JACK for audio output.
Yoshimi comes with a rather complete manual which you should be able to get to via Yoshimi > View Manual in the GUI. You should also find the manual installed at:
I was using version 1.7.0.1 for this. MIDI configuration was on page 44 of the manual in chapter 4 which covers the menus.
Like ZynAddSubFX, Yoshimi seems to use quite a bit of CPU while idling. 14% on my system as opposed to Fluidsynth which uses only about 1.3%. I've been told that this is because the pre-built packages in Ubuntu are not properly optimized. So if you find Yoshimi useful, it might be worth figuring out how to build it and optimize it. Chapter 22 of the manual covers this.
TiMidity is a sample-based synth like Fluidsynth. To launch with JACK:
zynaddsubfx - Additive and subtractive synthesis with effects. (Note: Pre-built packages may use a lot of CPU when idling. You might need to build this yourself to get a better optimized version.)
GrandOrgue - Very detailed organ simulation. A bit complicated to set up. See Connecting Rosegarden to GrandOrgue for a step-by-step.
Once you've figured out how to get all your MIDI hardware and softsynths set up, you can install and use a MIDI sequencer for serious music composition work. Two of the best are Rosegarden and Hydrogen. (Full disclosure: I'm a Rosegarden developer, so I'm quite biased.)
Rosegarden is a MIDI sequencer that offers multi-track recording and playback along with notation editing.
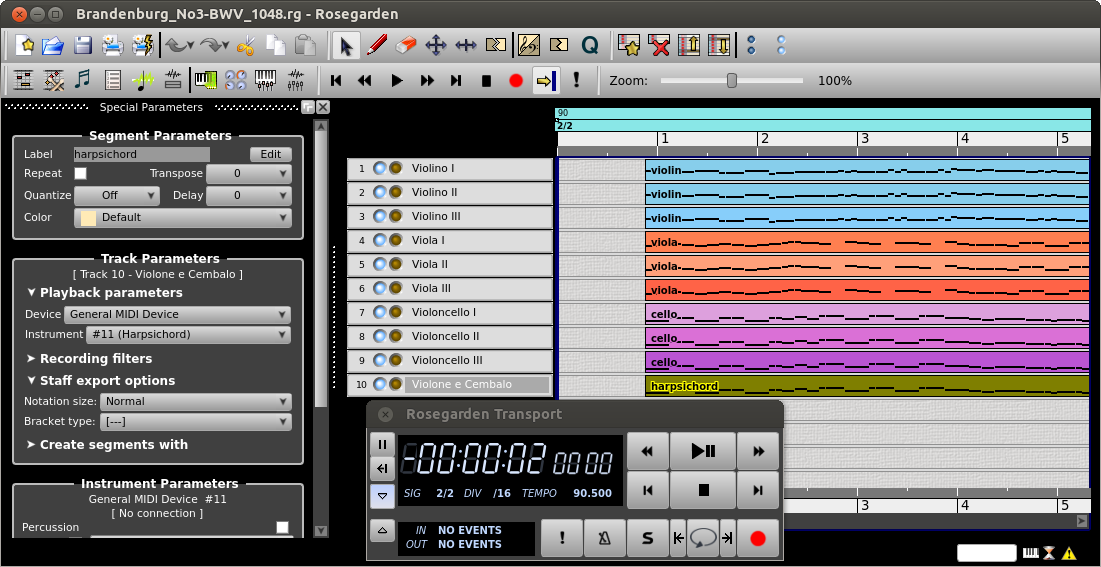
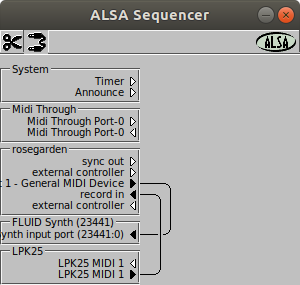
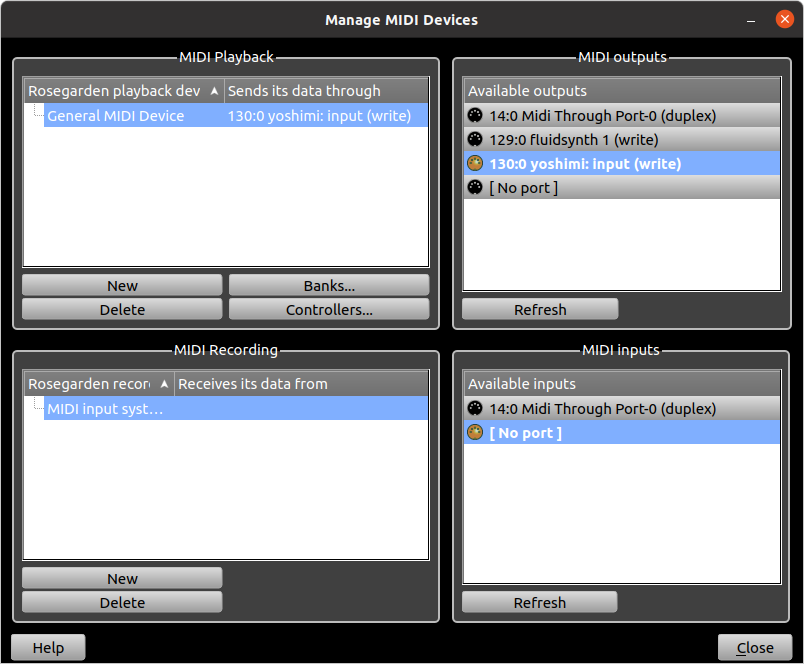
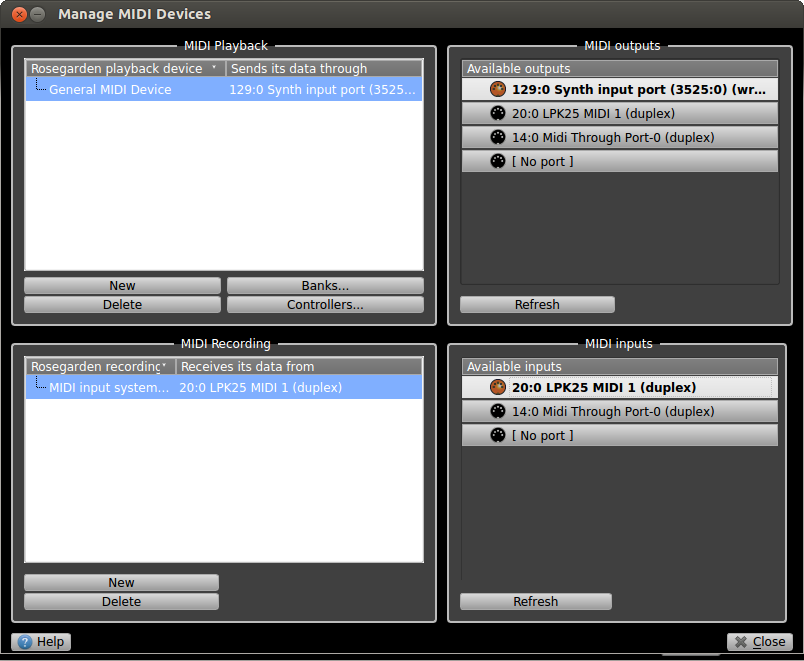
Rosegarden does require a little configuration to get it working. Sometimes it picks things up automagically, but other times you'll need to go to Studio > Manage MIDI Devices... in the menu and there you will be able to connect Rosegarden to your soft synths, keyboards, and other MIDI devices. Here's a screenshot of Rosegarden set up for fluidsynth and my Akai LPK25:
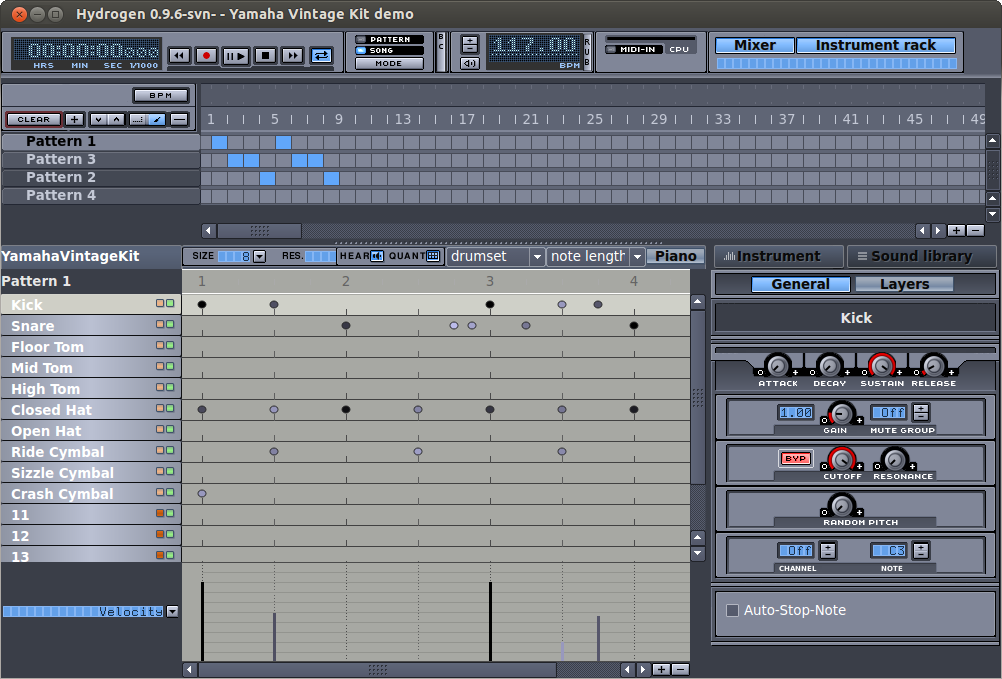
Hydrogen is a drum sequencer. It has its own softsynth built in, so it comes up ready to go.
Audacity - Sound editor. Also does multi-track recording.
Ardour - Digital audio workstation.
A MIDI monitor shows the MIDI messages that are being generated by MIDI hardware or software components. You can connect MIDI components directly to a MIDI monitor or set up a Y-cable using aconnectgui (or aconnect) to watch what is being sent between two components of a MIDI system.
aseqdump - Console-based MIDI monitor. Doesn't have a "clear" button like the GUI MIDI monitors, but you can mark important points in the dump by typing whatever text you want. E.g. a line of hyphens and enter can be used to mark an important point in a test case. aseqdump can be found in the alsa-utils package. From the ALSA project.
drumstick-dumpmid - Console-based MIDI monitor. Like aseqdump. drumstick-dumpmid can be found in the drumstick-tools package. From the drumstick project.
qmidiroute - GUI MIDI message remapper and MIDI monitor. From the AlsaModularSynth project.
kmidimon - GUI MIDI monitor. Can also load MIDI files and examine their contents (see smfsh below). Note: As of Ubuntu 20.04, kmidimon is no longer available from the package manager.
pw-mididump - Pipewire includes a MIDI file viewer. It can also monitor a pipewire MIDI connection.
mftext - Standard MIDI file to text. Part of midifilelib.
smfsh - The smf shell. Part of libsmf. Allows viewing and editing of standard MIDI files.
lilymidi - If you happen to have lilypond installed, you'll have the lilymidi command which can display the contents of a standard midi file as text. Use the "--pretty" option. The output is fairly obtuse, so I don't really recommend this one. E.g. a volume CC of 100 is shown as "7100".
Back in Installing a Low Latency Kernel, we looked at how to check whether you have a low latency kernel installed and whether the clock frequency was set to 1000Hz. If you discovered that your kernel was missing one of these key attributes, there are three main ways to remedy this.
The first way would be to see if your distro already has a low-latency kernel available and install it. In Ubuntu, use apt-cache search:
Pick the newest and install:
After that installs, reboot and go through the steps in Installing a Low Latency Kernel to make sure everything is correct.
The "edge" versions above supposedly have even more cutting edge hardware support. I would avoid unless something you need isn't working.
The second way would be to use a multimedia distro like Ubuntu Studio or AV Linux. These sorts of distros install a low-latency kernel by default.
And finally, if you don't mind building the kernel, you can adjust the configuration to get a low-latency kernel. In the category "Processor type and features," you'll find two key settings. The first is "Preemption Model" which should be set to "Preemptible Kernel (Low-Latency Desktop)". The second is "Timer frequency" which should be set to 1000Hz for decent audio performance.
My (somewhat outdated) steps for building my own kernel are in my Linux Kernel Build HOWTO.
Usually, the low-latency kernel, or the latest kernel you've built is the one that gets booted. If this doesn't appear to be happening, reboot and hold down the left shift key when the system is coming back up. This should give you the GRUB menu where you can select a specific kernel.
pulseaudio can get in the way of JACK sometimes. Unfortunately, you can't use the "kill" command to stop pulseaudio. pulseaudio is designed to be very aggressive about staying up and it will restart itself whenever it is killed. Fortunately there are a number of ways to stop pulseaudio and keep it from coming back.
First, determine whether pulseaudio is running using pgrep:
If you see a number and a command line after you run that (I got two numbers and command lines, you'll get different numbers), then pulseaudio is running. The number is the process ID.
Note: Stopping pulseaudio can have a negative effect on audio in all other apps. Problems can range from absolutely no sound to a broken volume control. I frequently get tripped up by this. E.g. I've got pulseaudio stopped and I try to watch a video in my web browser, or try to watch a movie. The video will not play. Be sure to restart pulseaudio when you want to use audio in other apps.
Here are three ways to get pulseaudio out of the way:
The most subtle way is to use pasuspender which will suspend pulseaudio while another program is running. This is most useful with JACK:
Newer versions of JACK seem to be aware of pulseaudio and suspend it for us. This might be more useful for running fluidsynth against ALSA.
You can also suspend pulseaudio indefinitely (or until you logout) like this:
To unsuspend:
If you'd like to get rid of pulseaudio at boot, edit /etc/pulse/client.conf and set autospawn to no:
After a reboot, pulseaudio will not come up unless you ask for it manually:
For more info, check out these pulseaudio man pages: pactl(1), pasuspender(1), and pulse-client.conf(5). "apropos pulse" gives a rather complete list. Also see Carla Schroder's tip and JACK's advice for getting JACK and pulseaudio to coexist.
Note: As of Ubuntu 20.04, patchage is no longer available from the package manager. qjackctl's new "graph" window appears to have stepped up to the plate and provides similar functionality. Keeping this section around for reference.
If you prefer something a little more graphical when connecting MIDI devices, try Patchage:
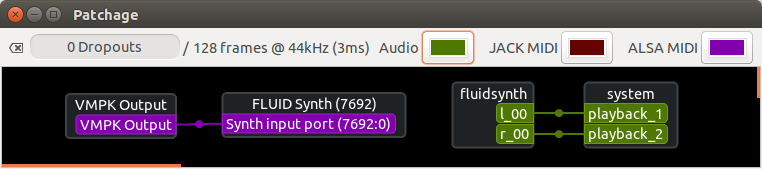
Patchage shows your MIDI devices as boxes. You can make connections by clicking on the colored connectors (with white text) at either end. You can also break connections the same way.
Note that Patchage launches JACK if it isn't already running. Make sure you've got a proper .jackdrc file in your home directory or JACK will be launched with defaults. See .jackdrc above. If you're avoiding JACK for testing reasons, you'll need to use aconnect instead of Patchage. You can also disconnect Patchage from JACK by using Patchage's System menu.
On my laptop (an HP G62) I noticed that whenever I plugged in my headphones, the speakers would go off, but there would be no sound on the headphones. It turns out that my particular laptop has separate output channels for the speakers and the headphones. If you happen to be unlucky enough to have the same problem, see my JACK and Headphones page for details. Later versions of the Linux kernel fixed this for me.
Copyright © 2011-2023, Ted Felix
Permission is granted to copy, distribute and/or modify this document under the terms of the GNU Free Documentation License, Version 1.3 or any later version published by the Free Software Foundation; with no Invariant Sections, no Front-Cover Texts, and no Back-Cover Texts. See http://www.gnu.org/licenses/fdl.html for the full text of this license.
<- Back to my Linux page.