
| _ Photo CD Home | Basics | Advanced | Software | Make Your Own | Links | email me! |
|
| Kodak Photo CD
|
That depends on what you need the copy for. Do you need a copy to play in your Photo CD player? Or do you just need the PCD files for use in a computer?
If you only need a copy of the PCD files to be used on a computer, then you will have to copy the PCD files from the Photo CD to your hard drive (copy the entire CD just to be safe). Then you can cut a CD from your hard drive.
You might think you could avoid copying the entire CD by just copying the PCD files in the PHOTO_CD\IMAGES directory on the CD. This works fine for regular Photo CDs, but not for Pro Photo CDs. With a Pro Photo CD you will also need the PHOTO_CD\IPE directory, so it is safer to just copy the whole thing.
If you need a copy that can be played in a Photo CD player, things are a bit more complicated. I've heard one report of someone having success with a Plextor CD-R drive, and DiscJuggler 3.x. Personally I've had little success with my Yamaha CRW6416S CD-R drive and Adaptec CD Copier Deluxe, CDRWin and DiscJuggler 3.0. My bet is that the Plextor CD-R drive is better at reading past Kodak's copy protection scheme on original Photo CDs. Hopefully others will send me their experiences so we can see if there is a pattern.
If you don't have a Plextor drive, or have had trouble copying Photo CDs with the CD-R drive you have, then you'll have to use Kodak's Build-It software to make copies of Photo CDs. See my Making Your Own Kodak Photo CD page.
When I tried copying a Photo CD with my Yamaha CD-R drive and Adaptec CD Copier Deluxe, I was partially successful. I ended up with a Photo CD that played just fine in my Photo CD player, but two of the image files were damaged. With DiscJuggler I had similar results, only this time only one file was damaged. It appears as if Kodak has put some sort of copy protection signal on the Photo CD which confuses CD drives when they try to read the data. CDRWin refuses to even read the Photo CD. It dies with a read error about 1% through the disc. Other types of CDs read and copy just fine. Writing the data is no problem since I've had no trouble creating working Photo CDs using Build-It, and generic CD-R media (it's not because of that little barcode like everybody thinks). A similar strategy is used on game CDs to prevent copying. Rumor has it that Plextor's CD-R drives are the best at reading past copy protection schemes.
First, check out Kodak's Explanation (I've placed a copy here in case the original moves on me). Then you can read mine which is quite similar.
There are three kinds of compression used to reduce Photo CD images from 18 meg to around 4 meg. First is the infamous lossy compression scheme called Gamma compression. This is pretty common throughout digital imaging these days. Photo CD images probably start their life in the scanner as 12-bit Gamma 1.0 (linear) data, then are compressed (with loss) to 8-bit Gamma 2.0 (logarithmic in a way). Next the data is converted from RGB to PhotoYCC to allow for a lossy compression scheme called "Chroma Subsampling". See the next section for more on that. An error correction scheme is used at this point in the process to reduce the losses caused by Chroma Subsampling. The image is decompressed and a delta is performed to measure the losses. This delta is then included in the PCD file to help reverse the loss on decompression. Last, the data is compressed with a lossless scheme called Huffman Coding. This scheme searches for recurring patterns in the data and encodes them as smaller codes.
Losses from Chroma Subsampling will appear primarily in fine detail. If there are fine lines with differing colors near one another, the colors can shift dramatically. Losses from Gamma compression are usually noticed as a loss of detail in dark areas, but this is common in imaging today, so we've all grown pretty used to it.
From reading Giorgianni and Madden's book "Digital Color Management", I've learned quite a bit about how PhotoCD works. PhotoCD images are encoded using a color space called "PhotoYCC". The reason for this encoding is to allow for a lossy compression technique called "chroma subsampling". Chroma subsampling means throwing away color information. JPEG compression also uses chroma subsampling, and an encoding similar to PhotoYCC. Photo CD one-ups JPEG by using an error correction scheme to help reverse the damage caused by Chroma Subsampling.
In playing with the open source tool hpcdtoppm, I've been able to experiment with the YCC to RGB conversion and understand it a bit better. In analyzing a number of PhotoCD images I noticed that the range of color values (the "C"s in YCC) is not fully used, much like the "a" and "b" values in Lab. This is because the YCC color space is capable of describing a very wide range of colors, and only a small portion of this range is normally used. As a result, the YCC color space might be susceptible to posterization much like Lab.
Here's a chart of the YCC color space I was able to generate using the hpcdtoppm source code:
 YCC Color Space Y = 128 |
C1(?) is on the Y-axis, and it affects the amount of blue. C2 is on the X-Axis, and it affects the amount of red.
The luminance is compressed in such a way at load time (the "Lost Highlights Problem") by Photoshop that about 33% of the Y data is lost in the conversion from YCC to RGB. This in addition to any limitation in the color space really makes YCC look like a pretty awful thing to do to your images. Picture Window gets at all of this luminance data, but it doesn't do color management, so the colors usually need a bit of tweaking. Though in theory, since YCC is based on the ITU-R BT.709 color primaries (aka Rec. 709, HDTV, same as sRGB), loading converted YCC data into Photoshop's sRGB space should be real close color-wise.
Hopefully I convinced you to avoid loading PhotoCD images directly into Photoshop on my Lost Highlights Problem page. If so, you can safely skip this section. If not, here are some helpful tips for loading images directly into Photoshop:
There is a newer version of the Photo CD File Format Plug-In available from Kodak. It doesn't really fix anything, but if you always want to have the latest versions of stuff, you should probably get it. Photoshop 5.5 ships with 3.0.6. You can download 3.0.7 from Kodak.
Always load your images with the "Color Negative" source profile. Why? 'Cause Kodak says so in document PCD-043. Here's an example of what happens if you don't heed this advice:
|
Kodachrome (PKR) Scanned to PhotoCD then loaded with two different Source profiles |
|
 Color Negative |
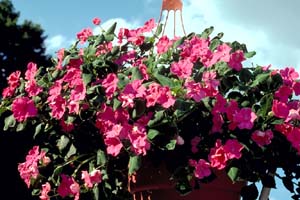 K-14 |
The version that was loaded with the seemingly appropriate K-14 source profile has a cyan sky, and blue tinting in the flowers. The Color Negative source profile gave results much closer to the original transparency. PCD-043 states, "Each output device... requires only a single transform to produce output images from any image encoded on any Photo CD disk." So, I guess the "Color Negative" profile is this "single transform". Then why does Photoshop offer the others? Paint Shop Pro 6.0, Picture Window, ThumbsPlus and my PhotoCD player know that PhotoCDs only need to be loaded with one source profile, so you aren't given the choice.
For the above images, the destination profile was sRGB, and the JPEGs should be marked with sRGB.
Many PhotoCD users prefer to load PhotoCD images into Lab by using the CIELAB destination profile. However, Lab exhibits the "Lost Highlights Problem" just like loading into sRGB. Others have noted that Lab allows you to adjust the levels in a PhotoCD image better than RGB mode.
You can sometimes get more highlight data, or more shadow data by tweaking the destination color profile that you use to load PhotoCD images. The Gamma setting in the color profile will let you do this to a certain extent. Higher Gamma values will give you a brighter image, and potentially more shadow detail. Lower Gamma values will give you a darker image and potentially more highlight detail. I work in the sRGB color space with a Gamma of 2.2. I then have two variations of sRGB with Gammas of 1.8 and 2.6 for darkening/lightening PhotoCD images. I'm not certain that this really gives you more data than you would otherwise have. Testing with Kodak's reference image might help determine the actual value of this approach (see PCD-102).
In trying to solve the "Lost Highlights Problem" without knowing about Picture Window, I discovered another technique that might help scans that load poorly. You can try loading the PhotoCD image into a color space that is wider than sRGB. This will fix any oversaturated colors, but it still might have badly blown highlights. This is because most color profiles only define a color gamut, and not a density curve (beyond the Gamma of the space). I tried Wide Gamut RGB and got better results. It still didn't come close to the results I get using Picture Window or my Hacked Photo CD Library.
Absolutely. Dan Richardson sent me this rough (see below) PHP code to extract the scanning date/time:
#!/usr/bin/php
<?php

$fn = 'IMG0001.PCD';
$fr = fopen($fn,'rb');
$found = 0;
while (!$found) {
   $byte = fread($fr,1);
   if ($byte == 'P') {
      #echo "found a P at offset $offset\n";
      $found = 1;
      fseek($fr,12,SEEK_CUR);
      $bytestr = fread($fr, 4);
      $byte14 = unpack('H*',$bytestr);
      $datehex = $byte14[1];
      $datedec = hexdec($datehex);
      $datestring = date(DATE_RFC822, $datedec);
      echo " Date Hex: $datehex\n Date Decimal: $datedec\n Date String:
$datestring\n";
   } else {
      $offset += 1;
      fseek($fr,1,SEEK_CUR);
   }
}
The block containing the scan date/time appears to always start at offset 1024 in the file, so the search for "P" (which starts "PCD_IPI") is probably not needed and might give bad results.
<- Back to my Photo CD page.
Disclaimers: I am not affiliated with Eastman Kodak in any way other than as a customer. All trademarks are owned by their respective owners. There are no ads on this page, and there never will be. Use this information at your own risk. Perform your own experiments before committing to PhotoCD for any purpose. I won't be held responsible for anything that happens to you as a result of reading this. Shake well before serving. The contents of this page are Copyright 2000, with all rights reserved by me, Ted Felix.
Copyright ©2000, Ted Felix